Optimizing My Small-Scale PCB Assembly Process with a DIY Solder Paste Stencil

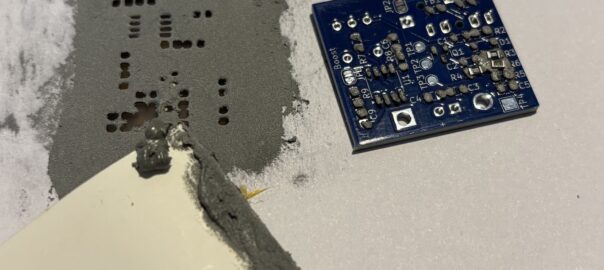
I recently embarked on a small-scale production run of a PCB with SMT components. To keep costs down, I ordered the PCBs and components separately from China and took on the soldering process myself.

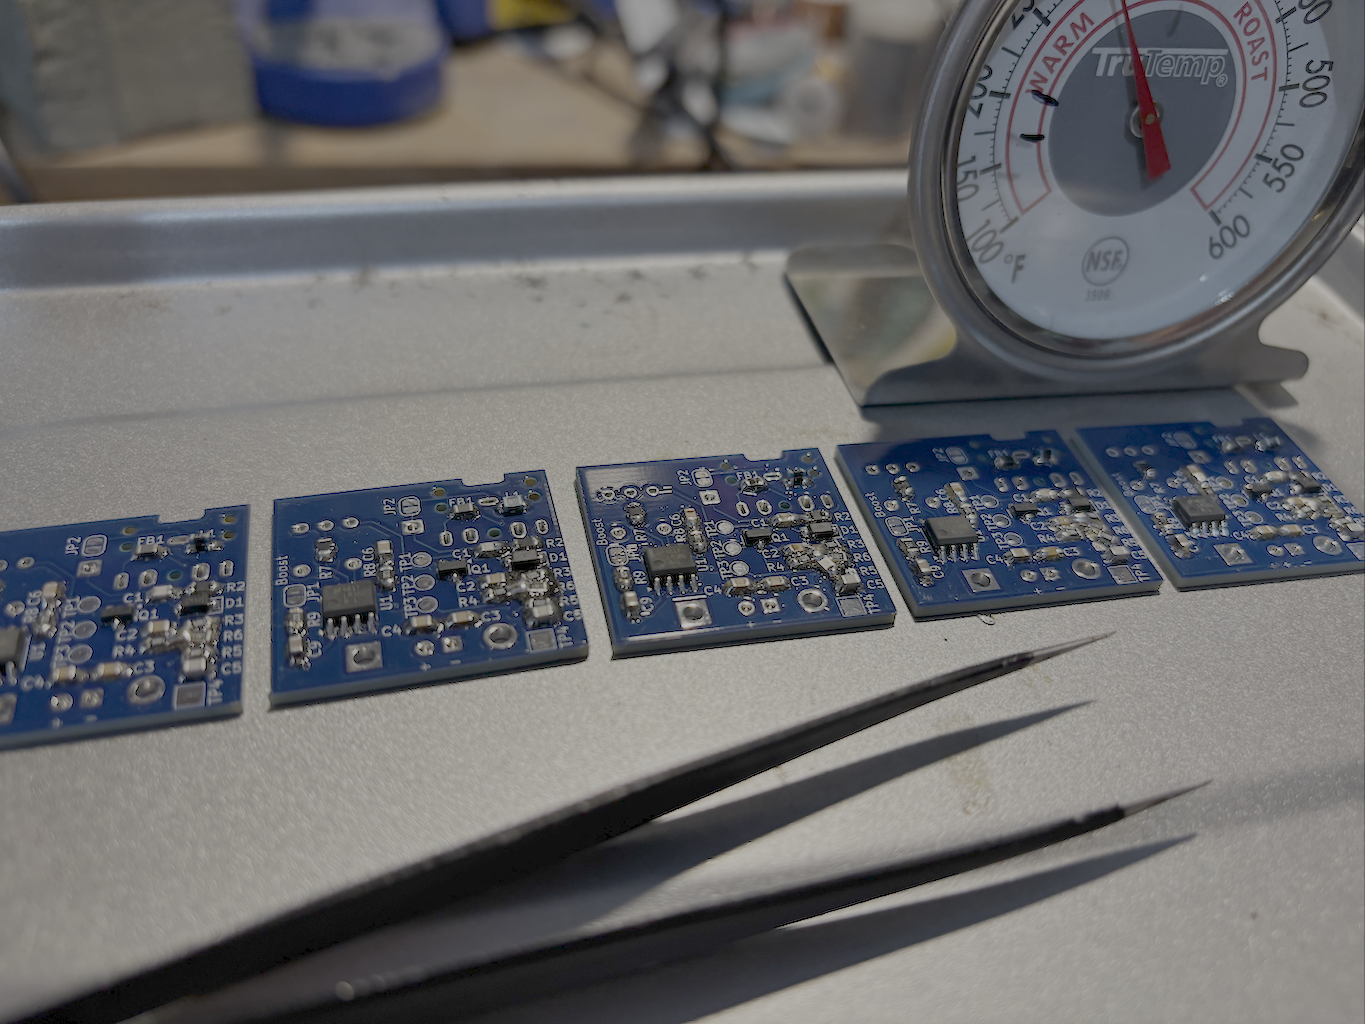
As a hobbyist, I’ve always found this approach quite manageable. I typically use a syringe with solder paste, applying it manually while using my phone as a microscope since the pads are so small. This method has served me well for years when working on one or two boards at a time. However, this time, I had a batch of ten units—and what used to be a quick task turned into an all-day endeavor.

Being an engineer at heart, I immediately started thinking about ways to optimize the process.

The Challenge: Applying Solder Paste Efficiently

The proper way to apply solder paste in a production setting is to use a stencil, just like those found in professional assembly lines. Unfortunately, I hadn’t thought ahead and neglected to order one. So, I decided to get creative and see if I could make one myself.

The Solution: A DIY Laser-Cut Stencil

I exported the solder mask layer from KiCad as an SVG file, then opened it in Inkscape. Using the JTech plugin, I generated the G-code for my modified 3D printer, which doubles as a laser engraver.

To my surprise, the results were better than expected! I used double-weight (160 g/m²) paper to ensure the stencil wouldn’t be too flimsy or tear. It held up fairly well during application, though I might try a thin plastic film next time for added durability.

Applying the Solder Paste

With the stencil in place, I spread a small amount of solder paste on one side and used a business card as a makeshift spatula to smear it evenly over the stencil openings. The paste is thicker than the ink I use for silk screen printing, so applying the right amount of pressure was key to getting a smooth, consistent layer.

Final Thoughts

This DIY approach turned out to be an effective solution for my small-scale production needs. While a professionally made stencil would still be the ideal choice, this quick improvisation saved me time and effort compared to my usual manual method. With a bit of refinement—perhaps using a sturdier material—this technique could become a reliable part of my workflow.

How to Use an All-Band Receiver to Listen to Airplane Pilot Communications with Ground Controllers

In the world of aviation, communication between pilots and air traffic controllers is crucial for safe and efficient operations. For aviation enthusiasts & radio hobbyists, listening in on these transmissions can be fascinating and insightful for many reasons,

While it may be tempting to use a simple off-the-shelf walkie-talkie style receiver or scanner to listen in on air traffic communications, doing so in or near an airport can be problematic. More importantly, airport security and aviation authorities generally view the use of such devices with suspicion. In some cases, they may even be prohibited in certain areas of an airport due to concerns about security and interference with official communications. even if your intentions are pure and have the proper equipment, trying to explain that to a concerned security officer can turn to be a headache.

enter the All Band Receiver.

Continue reading How to Use an All-Band Receiver to Listen to Airplane Pilot Communications with Ground Controllers

lessons learned

I was happy. I was extremely happy. 3 months of hard work had finished and the package containing 40 units of the product I was working on was shipped to the customer.

I’ve tracked the packed and verified it arrived at the warehouse where it was to be tested before installed at the first beta site. so I checked my email every day for news about what’s going on. i’ve checked it multiple times a day. and then the phone rang. on the line was the client’s technical manager, and the system was not functioning all that great. from what he described, it sounded like it’s stuck in a loop. this shouldn’t have happened and I felt horrible.

Continue reading lessons learned

rapid product development

During my years in product development, I’ve discovered many things they don’t teach you in school. One of the most significant revelations is that the part of the process that takes the most time is verifying that your product actually fits all stakeholders’ needs.

This is a tricky part for two reasons. First, it involves human beings. Figuring out the technologies needed for many commercial solutions is relatively straightforward. The laws of physics are well known, and for many technologies, there are standards and specifications. People, however, don’t come with manuals.

The second reason is that you can’t always identify a single user. It might be the person who presses the button or the one answering the call. You need to ensure it is easy for the installer to put in and for the maintenance personnel to replace the batteries with ease. You might also want to consider how your product will survive water splashes when the room it’s in is cleaned.

Continue reading rapid product development

Internet Radio

Many times when I drive home there something good on the radio that I want to continue to listen when I enter my house. alas, I have no radio attached to my speakers, just an amazon echo device. I’ve tried to build a matching looking FM receiver, but I couldn’t resolve the ground noise issues so I didn’t use it all that much. following some articles I read on line I’ve decided to try again, this time with a internet streaming device.

hardware

I’ve decided to base the radio around a raspberry pi 4, which i had many laying around, and there are many ready made software solutions. I’ve added a 5″ touchscreen for the UI which was reasonably priced and added to the light industrial look of my HiFi speakers. it plugs into the MIPI display port and works out of the box without requiring installing any drivers.

software

there are many options available, but this is a quick and easy project, so I’ve narrowed down the options to Volumio and mo0de, both having a ready to burn image on the raspberry pi SD card imager.

Continue reading Internet Radio

מדריך לנוער איך לנצח במשחקי מחשב

נועם הוא ילד בן 13. ואם יש משהו שבאמת חשוב לילדים בגילו, זה כמובן לנצח את כל החברים שלו במשחקי מחשב. לכן הוא מתאמן כל היום להקליק על הכפתור של העכבר ברצף כמה שיותר מהר כדי לירות ולחסל את האויבים שלו.

אז יום אחד הוא חשב על רעיון לבנות קופסא עם כפתור שיעשה את הפעולה הזו בשבילו. לדעתו, והוא מכיר את השוק הזה מבפנים, זה מוצר שיכול למכור מליונים

אני די בטוח יש איזה עכבר גיימרים שעושה את זה בדיוק, אבל אבא של נועם הוא חבר טוב אבל מאותגר טכנולוגית, וחוץ מזה הילד ביקש עזרה מהדוד הכי אהוב עליו, איך אני יכול לסרב ?

Continue reading מדריך לנוער איך לנצח במשחקי מחשב

ספק כח לברדבורד

לוחות ניסוי לבניה של מעגלי אלקטרוניקה (boardboards בלעז, או מטריצות בפי העם) הם דבר נפלא. הן מאפשרות לך לבנות מעגלים בזריזות. כשלימדתי תלמיד בית ספר לתכנת בארדואינו יכולתי לבוא כל שבוע עם רעיון חדש של רכיבים שרציתי לחבר ואת הכל בנינו על מטריצות שפרקנו בסוף השיעור. גם היום אני משתמש בהן כדי לבדוק רעיונות שאני לא בטוח בהם לפני שאני מדליק את המלחם ובונה מעגל ממש (בדרך כלל בstripboard שזה הבן דוד של המטריצה)

Continue reading ספק כח לברדבורד

עברית לקינדל

לאחרונה מרגיש שבא לי לחזור לקרוא. כילד הייתי קורא המון, ועם השנים זה הלך ופחת. ועדיין זה נורא כיף לשקוע לעולם חלופי בין דפי הסיפור.

כדי לחסוך בעלויות ולמנוע כריתת עצים ניסיתי לפני כמה שנים לקרוא ספרים דיגיטאלים באייפד, אבל זה לא היה זה. אז הפעם העלתי מהאוב מכשיר קינדל שהיה שייך לאשתי. אולי הטכנולוגיה של המסך e-ink תעשה את ההבדל

Continue reading עברית לקינדל

גלאי מתכות מבוסס תוכנה

כבר הרבה שנים שאני רוצה לבנות גלאי מתכות, ולא מזמן נתקלתי במאמר שתאר גלאי כזה אבל עם טוויסט אלגנטי, שהייתי חייב לנסות אותו בעצמי. הגלאי מבוסס תוכנה.

כל גלאי המתכות מתבססים על תכונה פיזיקלית פשוטה: סליל של חוט מוליך משנה את ההשראות שלו כאשר הוא נמצא ליד מתכת. השראות זו היכולת להתנגד לשינוי הזרם הזורם דרכו. כאשר אנחנו מזרימים זרם חשמלי דרך סליל, הוא מייצר שדה מגנטי. ככה למשל עובד אלקטרומגנט. אבל השדה הזה משרה בסליל עצמו מתח בכיוון ההפוך לזה שחיברנו וזה מייצר זרם שמתנגד לשינוי שגרמנו. ההשראות תלויה בהרבה גורמים, אבל מה שמעניין אותנו היא התלות בחומר שעליו מלופף הסליל. (מחשבון ערך סליל)

כדי לגלות את המתכת אנחנו בונים מעגל שמשתמש בשינוי בהשראות בנוכחות המתכת כדי לסמן לנו את המצאותה. דרך פשוטה למימוש תהיה לבנות מתנד שהתדר של הציפצוף שהוא מפיק משתנה עקב השינוי בהשראות. גלאים מתוחכמים יותר ישמשו בשני סלילים, אחד משדר ואחד קולט, כדי שיעבדו כמו שנאי. במאמר שקראתי מוצא מעגל בסיס והעיבוד אחר כך מבוצע בתוכנה על ארדואינו, וזה כבר מעניין.

Continue reading גלאי מתכות מבוסס תוכנה

הדפסת שמש – ציאנוטייפ

ציאנוטייפ, או הדפסת שמש בעברית, הוא תהליך פשוט ליצירת הדפסים שפותח לפני 180 שניה ומוכר בעיקר בגלל הגוון הכחול העמוק שלו. השיטה היתה נפוצה מאוד ביצירת עותקים של שרטוטים הנדסיים, כך שגם היום הם נקראים באנגלית blueprints.

כדי ליצור את ההדפס מערבבים שני חומרים (פריק אלומיניום סולפט ואשלגן פריציאניד) לתמיסה רגישה לאור אולטרה סגול (uv) אותה מורחים על הדף. על הדף מניחים שקף ועליו התמונה שרוצים להדפיס ואת כל זה מניחים בשמש. היכן שהחומר חשוף לאור, יתקבע הצבע הכחול, ואילו האזורים המוסתרים על ידי הקווים על השקף ישארו בהירים. זהו למעשה תהליך מאוד בסיסי ואיטי של צילום.

Continue reading הדפסת שמש – ציאנוטייפ